How I Started Tracking My ML Experiments Like a Pro
Only if I can gain back all the time I’ve wasted on Excel sheets.


I’m going to be completely honest with you; the time I’ve spent managing the machine learning experiments and keeping track of them is much, much, much more than the time I’ve ever spent on developing the machine learning models. In those early days, I would use Excel sheets, outline all the parameters and metrics I’m experimenting with, color code them, manually enter the results, and so on.
You get the picture.
I knew I needed to fix my workflow once and for all.
In this article, first, I would introduce why tracking experiments are important. Then I shall outline how MLFlow can make our lives easy and finally, I will walk you through an everyday example with code on how you could integrate it all by yourself. When you’re done following this, I promise you’re good to integrate MLflow and fix your workflow like a pro!
Why track experiments
No matter how experienced you are, you can never develop the best performing model in one go. The key to a best-performing model is an iterative process of optimizing the chosen metrics for the business problem at hand. Experimenting during model development is just another inevitable step in the data science lifecycle.
When it comes to research and product development, experimentation is the most critical step in the data science lifecycle. In such research-heavy problems, finding the best solution alone isn’t sufficient. You also need to outline the process you undertook to arrive at the best performing solution and ensure the solution is reproducible.
The bottom line is, the experimentation phase is just inevitable. We have no option but to establish an effective and efficient workflow to create experiments, track them, evaluate the results, store the models, and finally reproduce them.
MLflow to the rescue
When I talked to experts who had much more experience than me, I was recommended with few tools to give it a try. Some of the basic requirements I had were,
- Minimal changes to the existing code.
- Open-source and freely available.
- Platform independent — so I’m allowed to choose the platform that suits best the problem at hand.
MLflow met all these requirements and actually offered even more. I can’t wait to share more about MLflow with you all!

Simply put, MLflow is an open-source platform to manage the ML lifecycle, including experimentation, reproducibility, deployment, and a central model registry. Yes, you read that right, not just experiment tracking but the complete machine learning lifecycle. Some of the features they offer are,
- MLflow Tracking — Tracking experiments to record and compare parameters and results.
- MLflow Projects — Packaging ML code in a reusable, reproducible form to share with other data scientists or transfer to production.
- MLFlow Models — Managing and deploying models from a variety of ML libraries to a variety of model serving and inference platforms.
- MLFlow Model Registry — Central model store to collaboratively manage the full lifecycle of an MLflow Model, including model versioning, stage transitions, and annotations.
Though MLflow has all these advanced capabilities, in this article, we will focus on MLflow Tracking and how it can help us track our ML experiments in an organized manner.
Let’s get started, shall we?
First, fire-up your terminal and run the command pip install mlflow to install the package. Now that we have our environment set up let’s focus on our existing typical workflow. Stay with me, and before you realize, we’d have MLflow integrated.
Understanding the typical workflow

What better way to understand the typical workflow than a walkthrough with a well-known example! Here we will use the famous iris flower dataset and build a classification algorithm to predict the class type of the iris plant. Well, no particular reasons for choosing this dataset, other than the fact that it is readily available in the scikit-learn library, and you can try it instantly. Needless to say, the process remains the same regardless of the nature of the dataset or the problem.
Let’s breakdown the simple code for the classification problem.
- Lines 1–4, we import all the required libraries.
- Lines 6–12 we define a function that loads the iris data and makes the train test split, and returns it.
- Lines 14–24, we define a function that takes the data and the model parameters as input and builds a decision tree classifier, does prediction on test data, evaluates the accuracy and the F1 score. This function finally returns the model and the metrics that were evaluated.
- Lines 26–28 sets the parameters for the model, loads the data by calling the
load_iris_data()function and passes the data and parameters to thetrain_predict_evaluate_dtree()function.
If I have to run multiple experiments to find the best performing model, I’ve had no option but to let the functions run in a loop and then manually enter these parameters and metrics in an excel sheet. That’s the only way I used to keep track of all the experiments I would do during the entire project timeline. Now that we have gone through our existing model development workflow let’s understand how we can integrate MLflow to this workflow and fix it for better, like a pro!
Integrating MLflow in no time
I have promised minimal changes throughout the article. In our example, it’s just 6 extra lines of code. I was pleasantly surprised when I discovered this, and now there’s no way I’ll ever open an Excel sheet again.
Let’s dive into the code.
What has changed?
- Line 5: We import the mlflow library
- Line 6: Here, we import the relevant
mlflow.sklearnmodule as well. This entirely depends on which package the model is built on. Some alternatives aremlflow.tensorflow,mlflow.pytorch,mlflow.xgboostand so on. The complete list of available modules can be found in the official MLflow Python API documentation. - Line 7: Autologging is a recently introduced experimental feature that makes the MLflow integration hassle-free. This function automatically logs all the parameters, metrics and saves the model artifacts in one place. This enables us to reproduce a run or retrieve already trained model files for later use. It’s a simple feature to use and definitely worth looking at the documentation.
- Line 18: MLflow Tracking is organized around the concept of runs, which are executions of some piece of data science code. Suppose you want to find the best parameters to feed into the classifier model. You create multiple runs with varying parameters to find out which run gave you the best results. So what this line essentially does is to start a run using the
mlflow.start_run()function, so that you can associate everything you log to that particular run. - Lines 28–29:
autolog()currently logs the metrics that are associated with the training, such as train_accuracy only. However, in our example, we’d like to compare other test metrics such as test accuracy and test F1 score as well. Hence we make use of thelog_metric()function that enables logging of any custom metrics.
How you run multiple runs or experiments is totally up to you. You can choose to run the code multiple times when needed or execute multiple runs at once. I generally create a small loop with the parameters I want to experiment with and run it all at once. It looks something like this.for params in different_combinations_of_parameters:
model,metrics = train_predict_evaluate_dtree(input_data, params)
And we are good to go!
I thought I’ll be getting a dashboard to track my ML experiments?
Of course.
Everything you’ve logged so far can be accessed through the MLflow UI server. Simply run mlflow ui on your terminal (from the correct directory) and open up http://localhost:5000/ on your browser. And voila, you have it!
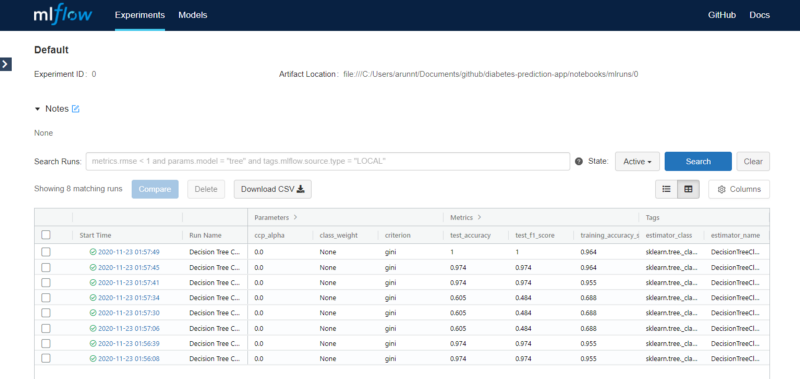
You can compare between several runs, visually analyze how a change in parameters changes the metrics, and even download the data as CSV in case you need to submit it as a report. The model files, along with the YAML environments, are saved as artifacts for you to use later. Take your time to navigate through the dashboard. It is pretty straightforward and extremely useful.
You might have to spend a bit of time going through the MLflow concepts to understand more about experiments, runs, artifacts, auto logging, and other features, but eventually, you’ll get the hang of it. I roughly spent about 5 days (mostly on researching and exploring the features) when I first integrated it into my workflow, but now I do it within minutes. I don’t think it can get simpler than this. It definitely has made me follow best practices and saved me a lot of time.
Final thoughts
In this article, we understood why tracking experiments is important and how we can integrate MLflow easily into our workflow. We did it like a pro using an easy to understand example problem as well! However, as we know, MLflow is more than just experiment tracking. Hopefully, I’ll write more about the advanced features soon.
I hope you enjoyed reading this as much as I enjoyed writing it for you. Nothing makes me happier than giving something that’ll be useful to you in the long run. I’d love to connect with you and hear your feedback. If you enjoyed this article, chances are you’ll enjoy my other articles too. Happy reading!